Building Serverless APIs with AWS Lambda, Node.js, and Typescript
Building Serverless APIs with AWS Lambda, Node.js, and Typescript
Building Serverless APIs with AWS Lambda, Node.js, and Typescript
In recent years, serverless architecture has gained immense popularity due to its scalability, cost-effectiveness, and ease of management. AWS Lambda, combined with Nodejs and Typescript, provides a powerful framework for developing serverless APIs that can handle a wide range of applications and workloads.
This article will explore how to build serverless APIs using Nodejs and Typescript in the AWS ecosystem.
Serverless architecture
Serverless architecture is a modern approach to building applications where developers focus on writing code without having to manage or provision servers. In a serverless model, the cloud provider(such as AWS Lambda) takes care of the infrastructure and automatically scales it based on the incoming traffic and workload. This eliminates the need for developers to worry about server provisioning, capacity planning, or infrastructure management.
Benefits
The benefits of serverless architecture are numerous. Firstly, it allows developers to focus solely on writing code, accelerating development and increasing productivity. Secondly, serverless applications can scale automatically, handling sudden spikes in traffic without any manual intervention. This scalability feature ensures that applications can handle any amount of workload, providing a seamless experience for users.
Another advantage is the cost-effectiveness of serverless architecture. With traditional server-based models, you pay for the server’s uptime, regardless of actual usage. In a serverless model, you only pay for your functions’ actual computing time, leading to significant cost savings. Additionally, serverless architectures often offer built-in services, such as logging, monitoring, and security, simplifying the development and maintenance process. Overall, the serverless architecture enables developers to build highly scalable, cost-efficient, and easily manageable applications.
Getting started
Now we have an understanding of serverless architecture and its benefits. Let’s build serverless APIs using Node.js and Typescript. Several popular frameworks are available for building serverless applications in AWS using Nodejs.
- Serverless Framework: The Serverless Framework is a widely adopted open-source framework that supports multiple cloud providers, including AWS. It simplifies the process of deploying and managing serverless applications by providing a command-line interface (CLI), configuration files, and a plugin system. The framework supports Node.js and other languages, and it allows you to define your infrastructure, functions, and event triggers in a serverless.yml file.
- AWS SAM (Serverless Application Model): AWS SAM is an AWS-native framework specifically designed for building serverless applications. It extends the capabilities of AWS CloudFormation to define serverless resources such as Lambda functions, APIs, and event sources. SAM provides a simplified syntax and additional deployment capabilities, making defining and deploying serverless applications on AWS easier.
- Claudia.js: Claudia.js is a deployment-focused framework for building serverless applications on AWS. It simplifies the process of creating and deploying Lambda functions, API Gateway APIs, and related resources. Claudia.js uses a command-line interface (CLI) to automate tasks such as creating IAM roles, configuring API Gateway, and deploying Lambda function from a single command.
In this tutorial, we will be using a Serverless framework to build Serverless APIs. We will be building an API to store contact form data and send notifications to the admin once it stores the information in the database.
Initialize a Nodejs project by running
mkdir contact-serverless-api
npm init --yes
It will create an empty directory of the application. Install the required dependency to start a simple express application.
npm install serverless-http expressOnce it installs the dependencies, create src/handler.ts and implement the functionality to create an express server.
import serverless from "serverless-http";
import express, { NextFunction, Request, Response } from "express";

const app = express();

app.get("/", async (req: Request, res: Response, next: NextFunction) => {
  return res.status(200).json({
    message: "Hello from data!",
  });
});

app.use((req: Request, res: Response, next: NextFunction) => {
  return res.status(404).json({
    error: "Not Found",
  });
});

export const handler = serverless(app);
As you can see, we are using serverless-http to adapt express application(app) for compatibility with a serverless platforms like AWS Lambda.
When building a serverless application, the serverless platform expects the handler function to follow a specific format. It should accept an event object and a context object as arguments and return a response. However, Express applications are typically built to handle HTTP requests and responses directly without considering the event and context objects.
Now we have a basic express application. Let’s make it a serverless API by configuring serverless.yml.
Create serverless.yml, and add the following configuration.
service: contact-serverless-api
frameworkVersion: "3"

provider:
  name: aws
  runtime: nodejs18.x

functions:
  api:
    handler: src/handler.handler
    events:
      - httpApi: "*"

plugins:
  - serverless-plugin-typescript
  - serverless-offline
It represents a basic configuration file for a serverless application using the Serverless Framework with AWS as the provider. The application is named “contact-serverless-api”.
The provider section specifies that AWS will be used as the cloud provider and the runtime for the application will be Node.js 18.x.
Under the functions section, there is a single function named “api”. It is configured to use the src/handler.handler as the handler function. This means that the code responsible for handling the function’s logic can be found in the handler.ts file in the src directory. The function is triggered by an HTTP event using an HTTP API.
The plugins section lists the additional plugins being used for the project. The serverless-plugin-typescript plugin enables TypeScript support in the Serverless Framework, allowing you to write your code using TypeScript. The serverless-offline plugin provides offline development and testing capabilities for your serverless application, allowing you to run and test the application locally before deploying it to AWS.
Install the plugin dependency for serverless framework,
npm install --save-dev **serverless-offline serverless-plugin-typescript typescript @types/express**Create tsconfig.json and the following code for typescript configuration,
{
  "compilerOptions": {
    "target": "es6",
    "module": "commonjs",
    "lib": ["es6"],
    "strict": true,
    "esModuleInterop": true,
    "moduleResolution": "node",
    "outDir": "dist",
    "sourceMap": true
  },
  "include": ["src/**/*.ts"],
  "exclude": ["node_modules", "dist"]
}
You can start the server using sls offline start command,
"scripts": {
    "start": "sls offline start",
    "build": "tsc"
 },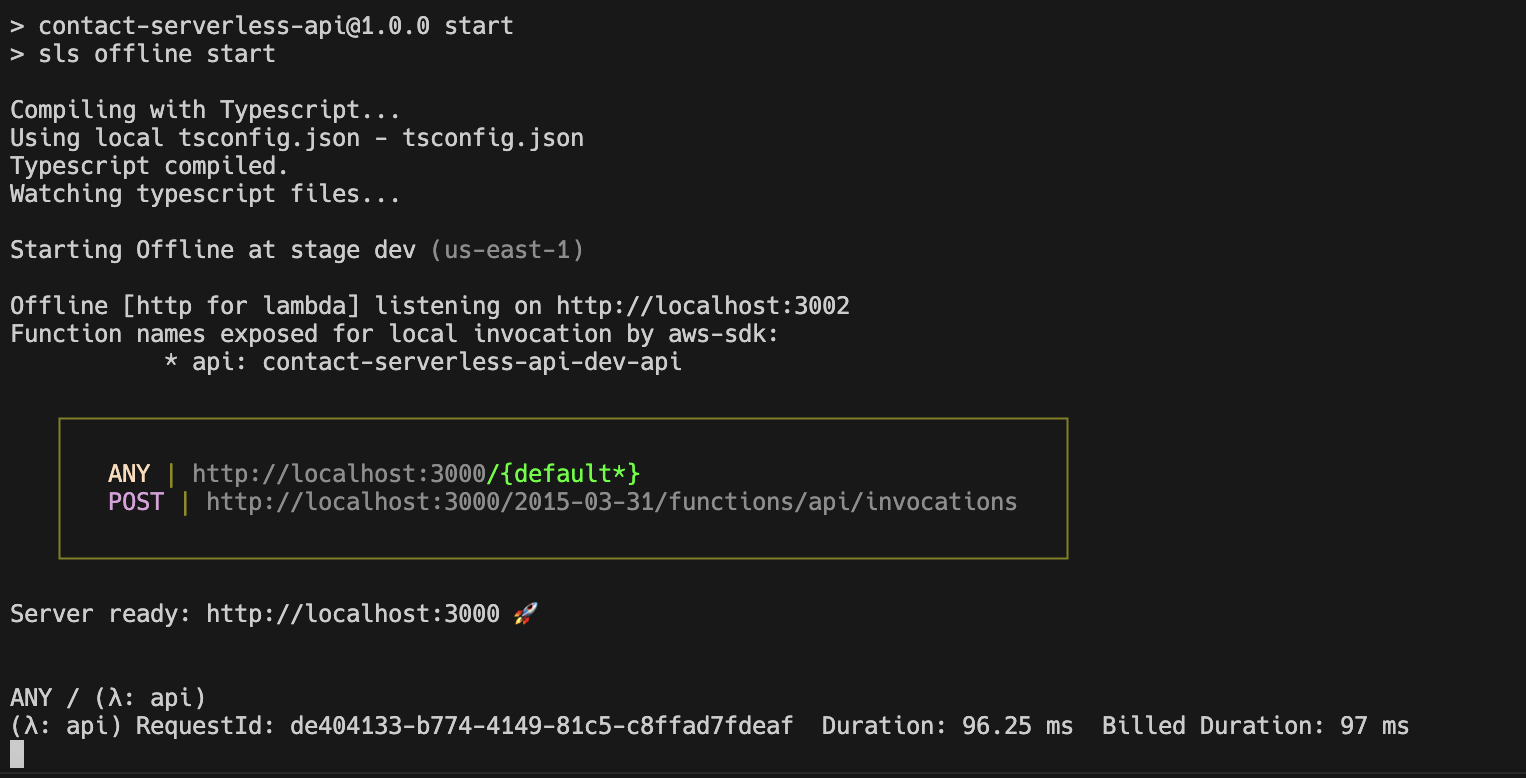
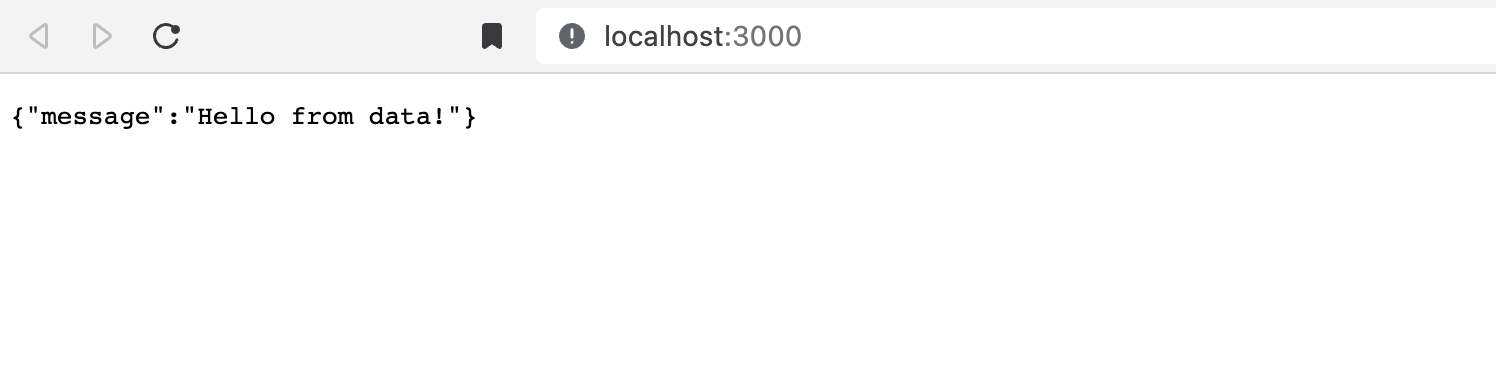
It will start the server in port 3000. you can visit http://localhost:3000/, which will return a response.
Now, we have the basic application running serverless. Let’s integrate AWS DynamoDB into our application. Before we integrate dynamodb in the application, we need to create dynamodb in AWS. For that, we need to configure serverless.yml to create dynamodb resource.
Add the configuration in serverless.yaml
resources:
  Resources:
    ContactsTable:
      Type: AWS::DynamoDB::Table
      Properties:
        TableName: contacts
        ProvisionedThroughput:
          ReadCapacityUnits: 1
          WriteCapacityUnits: 1
        KeySchema:
          - AttributeName: email
            KeyType: HASH
          - AttributeName: name
            KeyType: RANGE
        AttributeDefinitions:
          - AttributeName: email
            AttributeType: S
          - AttributeName: name
            AttributeType: S
This configuration is serverless.yaml file sets up a DynamoDB table named “contacts” with specific properties and attributes.
The Resources section defines the AWS resources that will be provisioned. In this case, it specifies a DynamoDB table named “ContactsTable”.
The Properties section within the table definition provides details about the table, such as its name, provisioned throughput (read and write capacity units), and key schema.
The key schema consists of two attributes: “email” and “name”. The “email” attribute is the hash key, and the “name” attribute is the range key. This schema determines how the data will be organized and queried within the DynamoDB table.
The AttributeDefinitions section defines the attributes used in the key schema, specifying their names and types. In this case, both “email” and “name” are of type string (S).
Overall, this configuration sets up a DynamoDB table named “contacts” with specific provisioned throughput, key schema, and attribute definitions, enabling the storage and retrieval of contact information within the table.
After that, create a directory lib to handle AWS services to interact within the application. Create DynamoDB/aws-dynamodb.ts and add the following code
import * as nanoid from "nanoid";
import { DocumentClient } from "aws-sdk/clients/dynamodb";

export default class DBClient {
  public readonly dynamodb: DocumentClient;
  private static instance: DocumentClient | null = null;
  constructor() {
    if (!DBClient.instance) {
      this.dynamodb = new DocumentClient();
      DBClient.instance = this.dynamodb;
    } else {
      this.dynamodb = DBClient.instance;
    }
  }

  async create(payload: any, tableName: string) {
    const params: DocumentClient.PutItemInput = {
      TableName: tableName,
      Item: {
        id: nanoid.nanoid(),
        ...payload,
      },
    };

    try {
      const response = await this.dynamodb.put(params).promise();

      console.log(response);
      return params.Item;
    } catch (error) {
      console.log(error);
      return null;
    }
  }

  async get(tableName: string, key: string, value: string) {
    const params: DocumentClient.GetItemInput = {
      TableName: tableName,
      Key: {
        [key]: {
          S: value,
        },
      },
    };

    try {
      const data = await this.dynamodb.get(params).promise();
      return data.Item;
    } catch (error) {
      console.log(error);
      return null;
    }
  }

  async put() {}

  async delete() {}
}
It creates a class called DBClient that serves as a wrapper for interacting with AWS DynamoDB using the AWS SDK’s DocumentClient class. It provides methods for creating and retrieving items from a DynamoDB table.
The constructor of the DBClient class initializes a singleton instance of the DocumentClient to ensure that only one instance is created throughout the application. This improves efficiency by reusing the same client object for subsequent operations.
The create method takes a payload and table name as parameters. It generates a unique ID using the nanoid library and constructs the parameters for a put operation to insert the item into the specified table. Upon successful insertion, it returns the created item.
The get method retrieves an item from the DynamoDB table based on a provided key and value. It constructs the parameters for a get operation and returns the retrieved item if found.
This code encapsulates the logic for interacting with DynamoDB, providing convenient methods to create and retrieve items from a table. It demonstrates the use of the AWS SDK’s DocumentClient and the nanoid library for ID generation.
To make this code work, we need to allow the lambda function to access the resource. To do that, we need to create IAM role permissions for the Lambda function.
service: contact-serverless-api
frameworkVersion: "3"

provider:
  name: aws
  runtime: nodejs18.x
  environment:
    FINANCIAL_API_KEY: HCNOLDWWKNQWNPJJ
  iamRoleStatements:
    - Effect: "Allow"
      Action:
        - "dynamodb:PutItem"
        - "dynamodb:GetItem"
        - "dynamodb:DeleteItem"
        - "dynamodb:Scan"
        - "ses:SendEmail"
      Resource: "*"

functions:
  api:
    handler: src/handler.handler
    events:
      - httpApi: "*"

plugins:
  - serverless-plugin-typescript
  - serverless-offline
  - serverless-dynamodb-local

resources:
  Resources:
    ContactsTable:
      Type: AWS::DynamoDB::Table
      Properties:
        TableName: contacts
        ProvisionedThroughput:
          ReadCapacityUnits: 1
          WriteCapacityUnits: 1
        KeySchema:
          - AttributeName: email
            KeyType: HASH
          - AttributeName: name
            KeyType: RANGE
        AttributeDefinitions:
          - AttributeName: email
            AttributeType: S
          - AttributeName: name
            AttributeType: S
The iamRoleStatements section defines the IAM (Identity and Access Management) role permissions for the Lambda function. It specifies that the function is allowed to perform specific actions on DynamoDB and SES (Simple Email Service). The actions include PutItem, GetItem, DeleteItem, Scan on DynamoDB, and SendEmail on SES. The Resource field is set to "*" which means that these permissions apply to all resources of the specified services.
Now that we have configured DynamoDB and serverless. create an endpoint to handle contact creation.
app.post(
  "/contact/create",
  async (req: Request, res: Response, next: NextFunction) => {
    const dbClient = new DBClient();

    // parse the body

    const body = JSON.parse(req.body);

    const response = await dbClient.create(body, "contacts");

    if (response !== null) {
      const emailService = new EmailService();
      emailService.sendEmail({
        from: "<FROM Email>",
        to: "<TO Email>",
        subject: "Contact created",
        message: "Contact created successfully!",
      });

      return res.status(200).json({
        message: "Contact created successfully!",
        data: response,
      });
    } else {
      return res.status(500).json({
        message: "Contact failed to create!",
      });
    }

    // console.log("body", body);
  }
);
After that, create SES/aws-ses.ts to handle AWS SES integration. Add the following code to send email via AWS SES service.
import * as AWS from "aws-sdk";
export default class EmailService {
  public readonly ses: AWS.SES;
  private static instance: AWS.SES | null = null;
  constructor() {
    if (!EmailService.instance) {
      this.ses = new AWS.SES();
      EmailService.instance = this.ses;
    } else {
      this.ses = EmailService.instance;
    }
  }

  async sendEmail(payload: any) {
    const params: AWS.SES.SendEmailRequest = {
      Source: payload.from,
      Destination: {
        ToAddresses: [payload.to],
      },
      Message: {
        Subject: {
          Data: payload.subject,
        },
        Body: {
          Text: {
            Data: payload.message,
          },
        },
      },
    };

    try {
      const response = await this.ses.sendEmail(params).promise();

      console.log(response);
      return response;
    } catch (error) {
      console.log(error);
      return null;
    }
  }
}
The constructor of the EmailService class initializes a singleton instance of the SES client to ensure efficient resource usage and avoid unnecessary re-creation of the client.
The sendEmail method takes a payload object containing details such as the sender’s email address (from), recipient’s email address (to), email subject, and message. It constructs the necessary parameters for the sendEmail operation using the payload data.
The sendEmail method then uses the ses client to send the email using the provided parameters. Upon successful email sending, it logs the response and returns it.
In case of an error during the sending process, the method catches the error, logs it, and returns null.
So far, we have configured and created a lambda function to create a contact and notify the admin about the contact using AWS SES. To test this email, we need to configure “Verified Identities” in the AWS SES service.
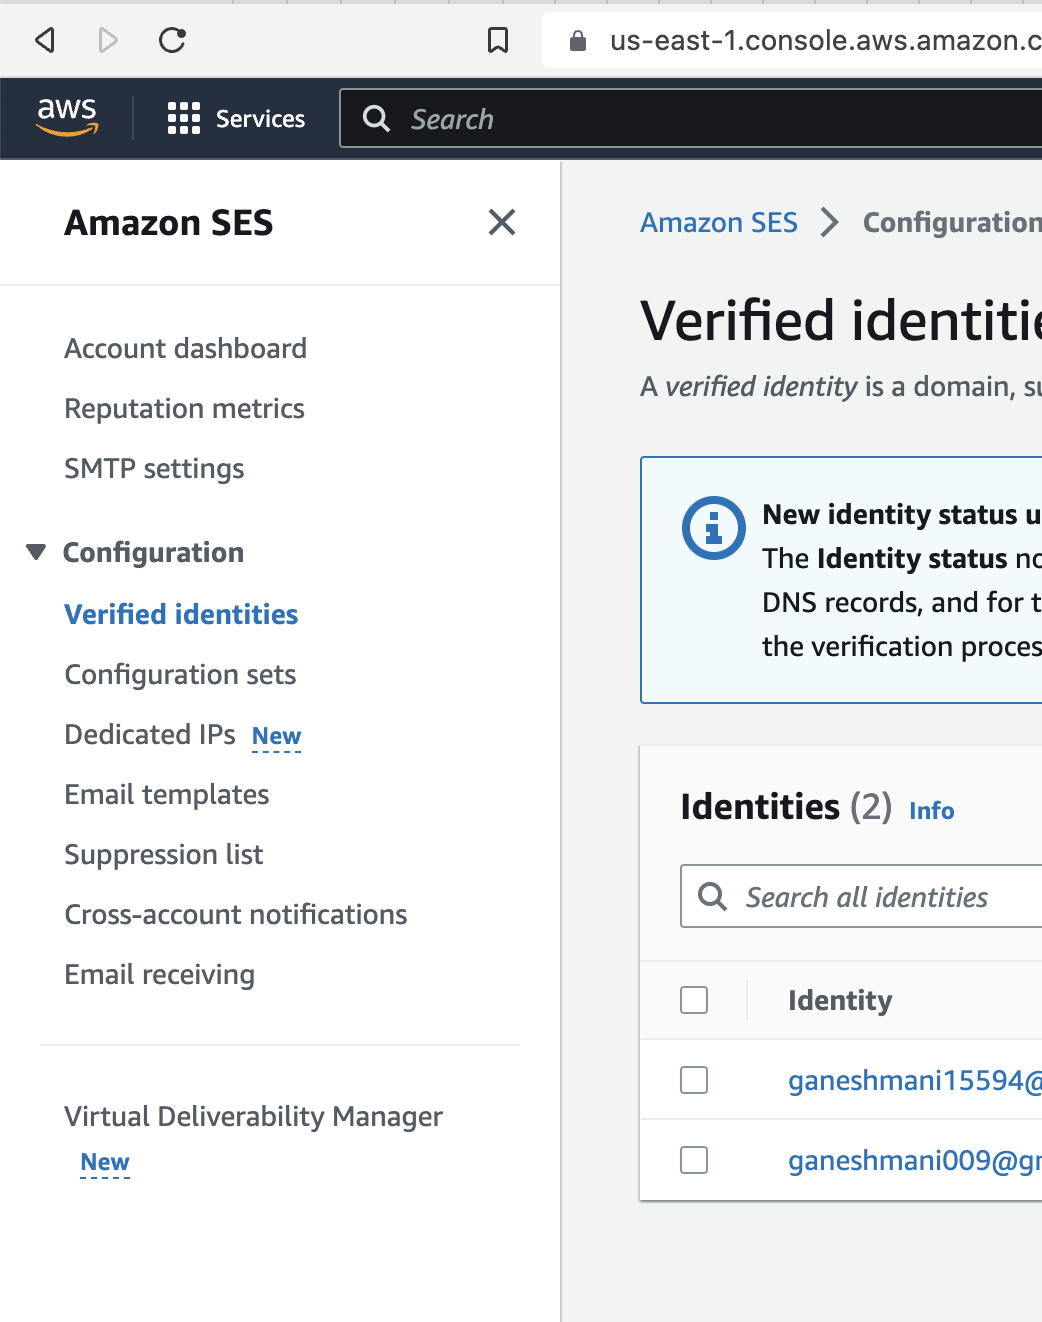
To leverage verified identities in AWS SES, you can configure your serverless API to use a verified “From” email address or domain when sending emails. This ensures that recipients receive emails from a trusted source and improves the chances of successful email delivery. Additionally, you can monitor your email metrics and reputation within AWS SES to maintain the reliability and trustworthiness of your serverless API’s email communications.

Now we have everything ready to deploy the application to AWS, you can deploy the application using serverless deploy command,
$ serverless deploy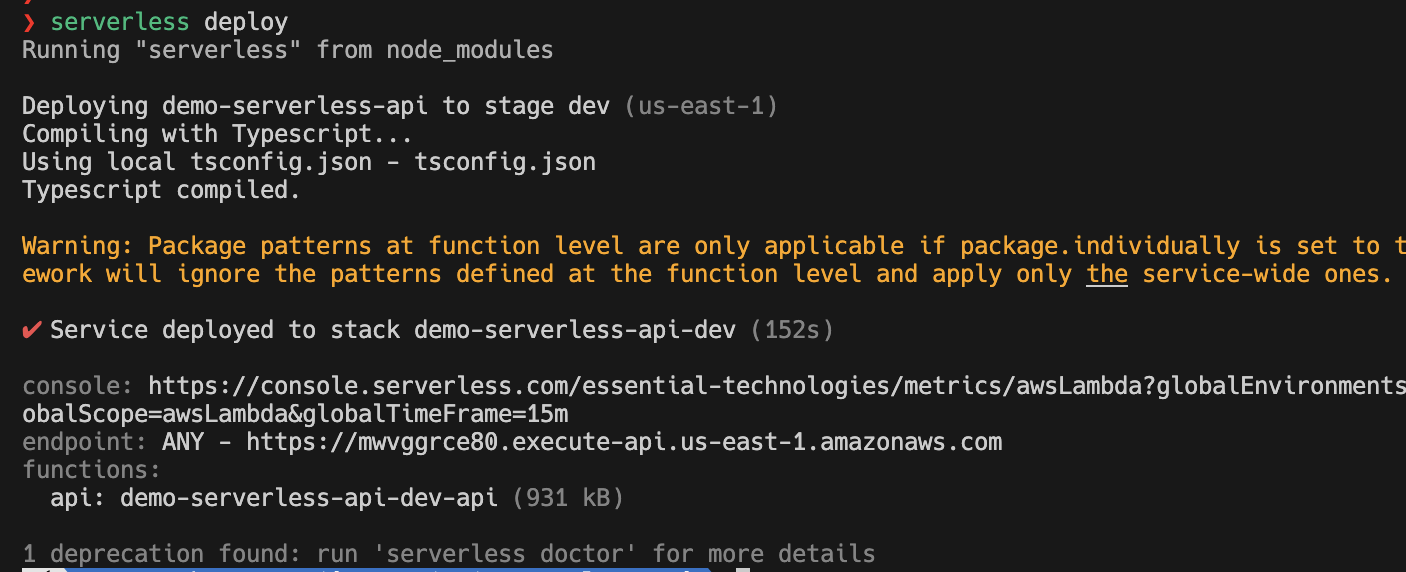
Checkout the complete source code here.