Supabase + NextJS - Authentication & CRUD API
Supabase + NextJS - Authentication & CRUD API
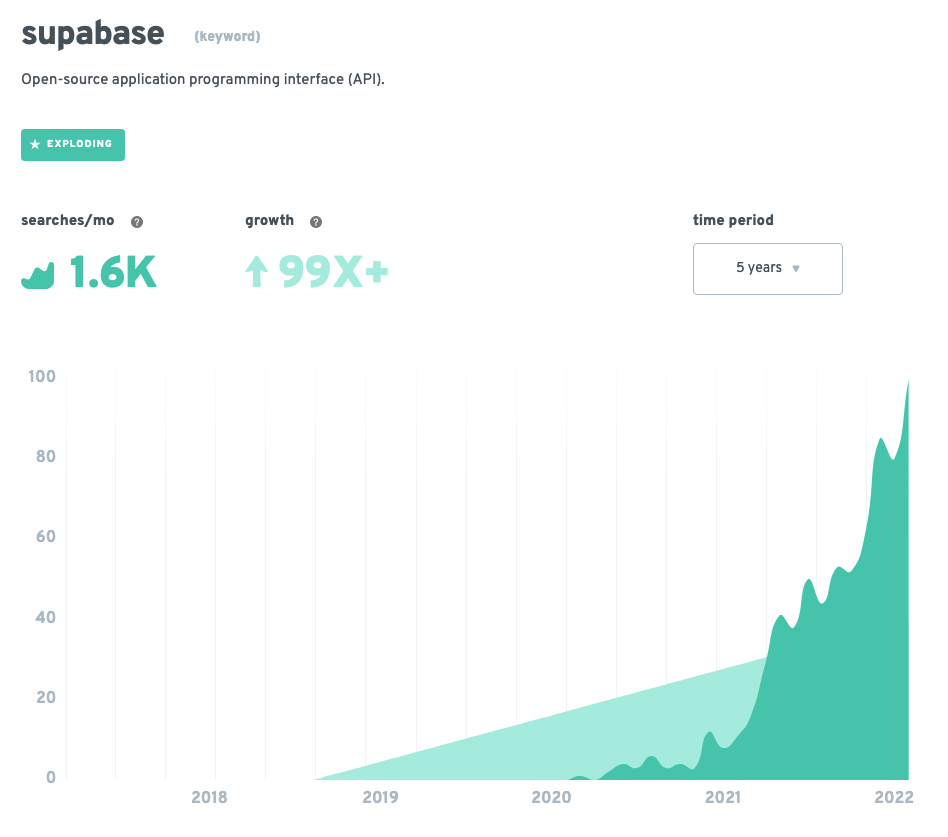
Supabase has been growing by 100x with 2k searches per month. If you’re wondering what supabase is or wanting to learn about it. you’re in the right place. This article is to explain about basics of Supabase and building a simple application with Supabase, Next.js.
What is Supabase?
According to the official documentation,
Supabase is an open source Firebase alternative. It provides all the backend services you need to build a product. Supabase uses Postgres database with real-time capabilities. Basically, supabase provides an interface to manage postgres database that you can use to create table and insert, edit and delete data in the table.
We can use REST API or client libraries from supabase to access the data in the postgres database. Supabase is not just about accessing the database. it also provides some solutions out of the box such as Authentication, File Storage and Real-time capabilities.
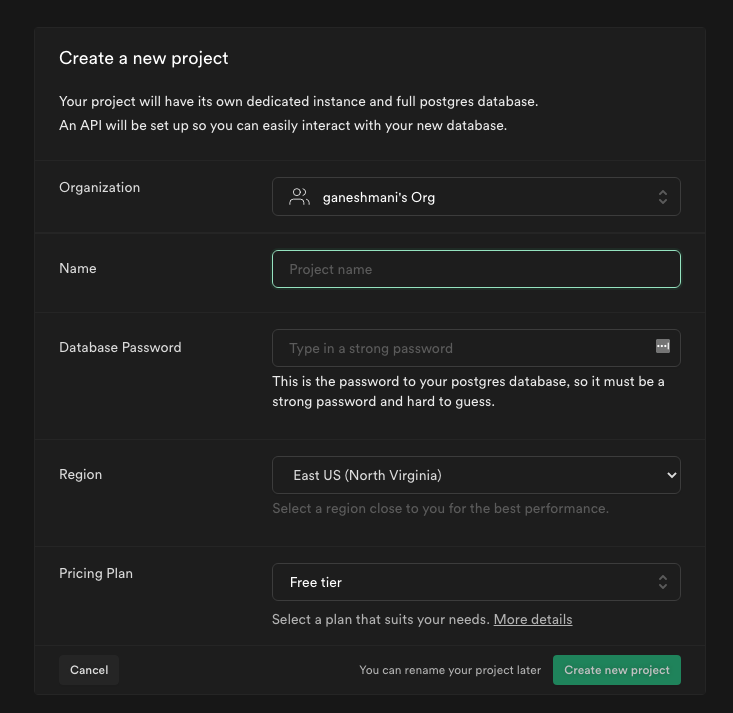
Let’s create a new project in Supabase that creates a credentials to access the database.
-
Go to https://app.supabase.io/
-
Click on New Project
-
It will launch the database and required credential to access them.
Once you create the database and credentials to access it, let’s create a Next.js application and integrate supabase into it.
Supabase + Next.js
To give a taste of what we are going to build in this application. Here’s a demo to explain this simple application.
https://github.com/ganeshmani/supabase-examples/tree/main/NextjsCRUD
Let’s create a Next.js application and install supabase-js client library to integration Supabase.
npx create-next-app NextjsCRUD --ts
cd NextjsCRUD
Then install the supabase client library to access supabase in the Next.js application.
npm install @supabase/supabase-jsOnce you install the dependancy, add environment variables for Supabase url and supabase key to access supabase by creating .env.local in the project root directory.
NEXT_PUBLIC_SUPABASE_URL = YOUR_SUPABASE_URL;
NEXT_PUBLIC_SUPABASE_ANON_KEY = YOUR_SUPABASE_ANON_KEY;
Now that you have API credentials, let’s create a helper to initialize the supabase client. This supabase instances and credentials are exposed on the browser and it’s safer since we have Row level security enabled in our database.
create lib/supabaseClient.js and add the following code,
import { createClient } from "@supabase/supabase-js";

const supabaseUrl = process.env.NEXT_PUBLIC_SUPABASE_URL || "";
const supabaseToken = process.env.NEXT_PUBLIC_SUPABASE_ANON_KEY || "";

export const supabaseClient = createClient(supabaseUrl, supabaseToken);
It creates a supabase client with supabase url and supabase token that you provide via environment variable. you can use the supabase client wherever you need to access the database.
Styling
For styles, we are going to use Chakra UI. It’s opinionated. you can use your own preferred styling like TailwindCSS, Material UI etc.
To setup chakra UI, install the dependancy @chakra-ui/react
npm install @chakra-ui/reactThen, set it up inside the _app.tsx ,
import "../styles/globals.css";
import type { AppProps } from "next/app";
import { ChakraProvider } from "@chakra-ui/react";

function MyApp({ Component, pageProps }: AppProps) {
  return (
    <ChakraProvider>
      <Component {...pageProps} />
    </ChakraProvider>
  );
}

export default MyApp;
Authentication
Authentication using Supabase is straightforward and supabase provides a solution out of the box. Supabase provides several ways to authenticate users. They are,
- Email & Password.
- Magic Links(one-click logins).
- Social providers(Facebook, Google, Twitter etc).
- Phone logins.
For authentication, we are going to use Magic links, so users can sign in with their email without using passwords.
login.tsx
import { useState } from "react";
import type { NextPage } from "next";
import { supabaseClient } from "../lib/supabaseClient";

import {
  Flex,
  Box,
  FormControl,
  FormLabel,
  Input,
  Checkbox,
  Stack,
  Link,
  Button,
  Heading,
  Text,
  useColorModeValue,
} from "@chakra-ui/react";

const Login: NextPage = () => {
  const [loading, setLoading] = useState(false);
  const [email, setEmail] = useState("");

  const handleLogin = async (email: string) => {
    try {
      setLoading(true);
      const { error } = await supabaseClient.auth.signIn({ email });
      if (error) throw error;
      alert("Check your email for the login link!");
    } catch (error: any) {
      alert(error.error_description || error.message);
    } finally {
      setLoading(false);
    }
  };
  return (
    <Flex
      minH={"100vh"}
      align={"center"}
      justify={"center"}
      bg={useColorModeValue("gray.50", "gray.800")}
    >
      <Stack spacing={8} mx={"auto"} maxW={"lg"} py={12} px={6}>
        <Stack align={"center"}>
          <Heading fontSize={"4xl"}>Sign in to your account</Heading>
        </Stack>
        <Box
          rounded={"lg"}
          bg={useColorModeValue("white", "gray.700")}
          boxShadow={"lg"}
          p={8}
        >
          <Stack spacing={4}>
            <FormControl id="email">
              <FormLabel>Email address</FormLabel>
              <Input
                type="email"
                placeholder="Enter your email"
                value={email}
                onChange={(e) => setEmail(e.target.value)}
              />
            </FormControl>
            <Stack spacing={10}>
              <Button
                isLoading={loading}
                bg={"blue.400"}
                onClick={(e) => {
                  e.preventDefault();
                  handleLogin(email);
                }}
                color={"white"}
                _hover={{
                  bg: "blue.500",
                }}
              >
                Send magic link
              </Button>
            </Stack>
          </Stack>
        </Box>
      </Stack>
    </Flex>
  );
};
export default Login;
Here, we have a input to capture the email address and button to handle the login functionality.

Once user clicks the Send magic link button, we call the handleLogin function that uses supbase auth signin.
const handleLogin = async (email: string) => {
try {
setLoading(true);
const { error } = await supabaseClient.auth.signIn({ email }); //Supabase Auth signin
if (error) throw error;
alert("Check your email for the login link!");
} catch (error: any) {
alert(error.error_description || error.message);
} finally {
setLoading(false);
}
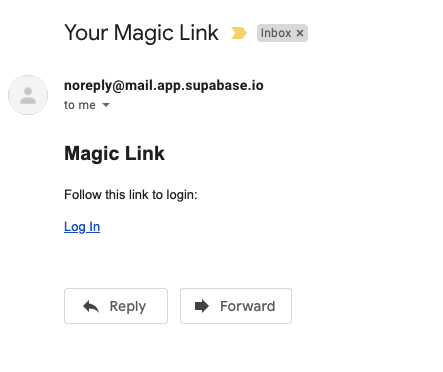
};Then, user receives a magic link in their email to login to the application.
It will redirect the user into the application’s home page. We can also configure the redirect URL via supabase auth settings. It’ll update the redirection after the user clicks the login link.
To configure redirect URL for post authentication,
-
Go to projects
-
Click on Auth and click on settings to change the default redirect URL.
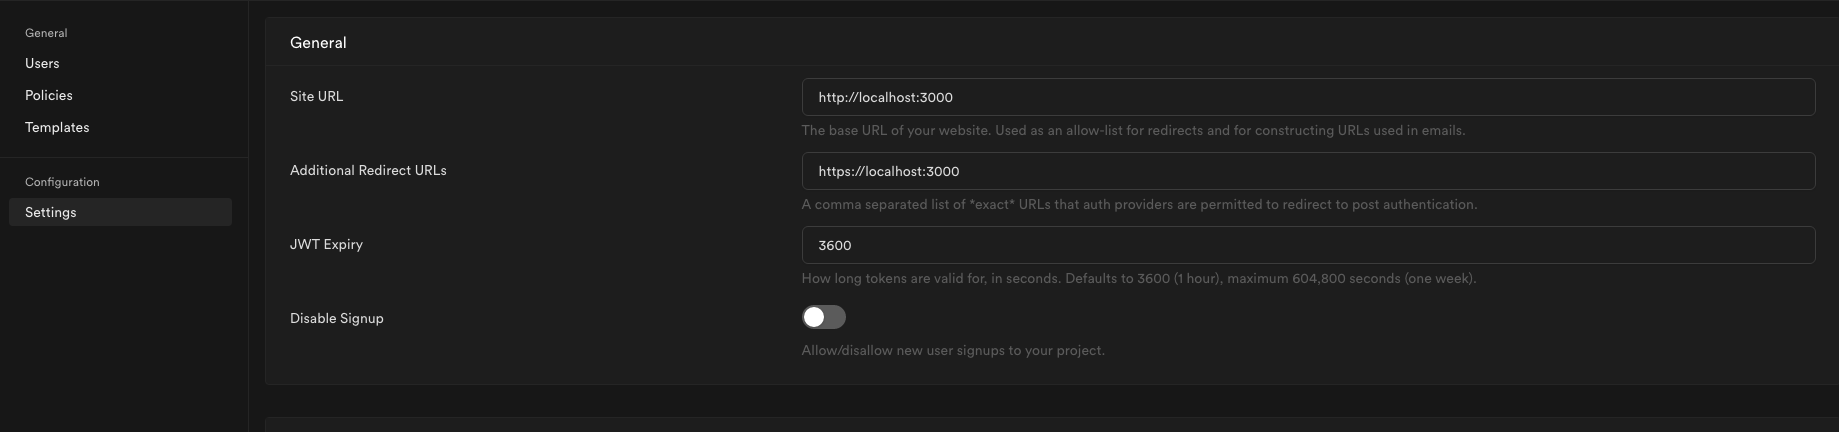
You can also access the users list who signed in your application via users section in supabase.

Once the user login, supabase stores the user information in the session. we can access the user information via supabase sessions. We need that information to validate the user everytime when they visit the protected routes. it can be home page or dashboard.
For that, let’s create a custom hooks to get user information from supabase session and access it via user variable. In that way, wherever we need to user information, we don’t need to write the same functionality inside the component again.
To learn about custom hooks in react: refer the documentation here
create hooks/useUser.ts and add the following code,
import { useState, useEffect } from "react";
import { supabaseClient } from "../lib/supabaseClient";
const useUser = () => {
  const [user, setUser] = useState < any > null;
  const [isLoading, setLoading] = useState < boolean > true;
  const [token, setToken] = useState < any > null;

  useEffect(() => {
    const supabaseSession = supabaseClient.auth.session();

    if (supabaseSession?.user?.id) {
      setUser(supabaseSession.user);
      setToken(supabaseSession.access_token);
    }

    setLoading(false);

    supabaseClient.auth.onAuthStateChange((_event, session) => {
      if (session?.user?.id) {
        setUser(session.user);
        setToken(session.access_token);
      }
      setLoading(false);
    });
  }, [supabaseClient]);

  return {
    user,
    isLoading,
    token,
  };
};

export default useUser;
Here, we are using useState to store user info, loading state and token. Initially, we have loading: true to indicate the component that it’s loading. Once we get user information from supabase session. we store them into user state in the hooks and set loading: false.
Now, let’s add this step into index.tsx here to verify if the user is authenticated or not. if not, we can redirect to /login page.
const Home: NextPage = () => {
  const router = useRouter();
  const { user, isLoading, token } = useUser();

  useEffect(() => {
    if (!user && !isLoading) {
      router.push("/login");
    }
  }, [user, isLoading, router]);

  if (isLoading) {
    return <div>Loading</div>;
  } else {
    return (
      <Layout>
        <Container>//CRUD API - Todo Container</Container>

        <Toaster />
      </Layout>
    );
  }
};

export default Home;
Now, the user is logged in, let’s see how to implement CRUD API using Supabase in Next.js application.
Supabase + Nextjs - CRUD API
Since this tutorial is to learn how to implement CRUD functionality using Supabase, Next.js. we will go with a classic example. i.e., Todo Application.
First and foremost, create a new table in the postgres database. We can use supabase UI to create a table.
- Go to Project
- Click on the Table Editor(Left side Menu)

-
Click on
Create a new tableand add the following column inside the table.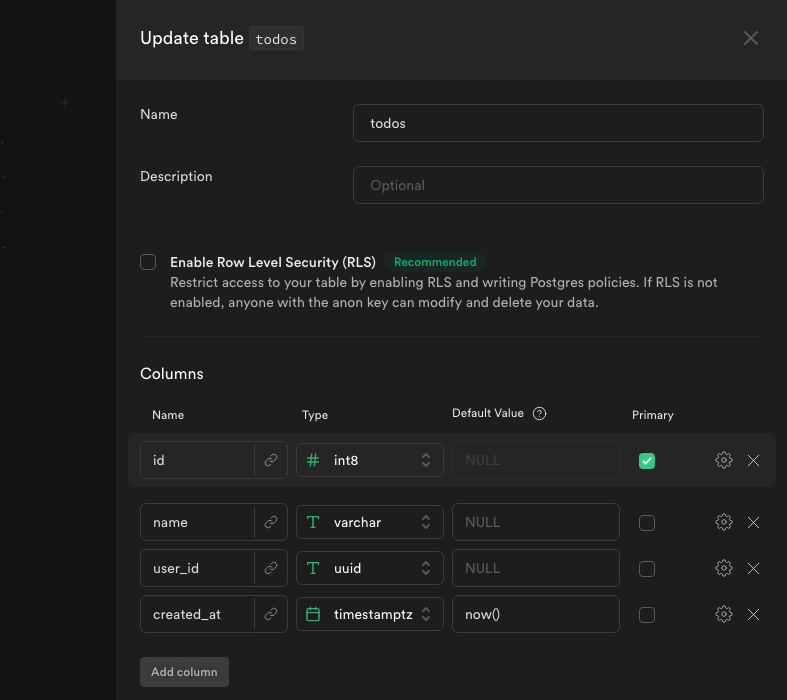
Once you add and create a table. we can use it via supabase client in the react application. whenever you need a new column or change a column, you can edit the table and update it.
TODO UI
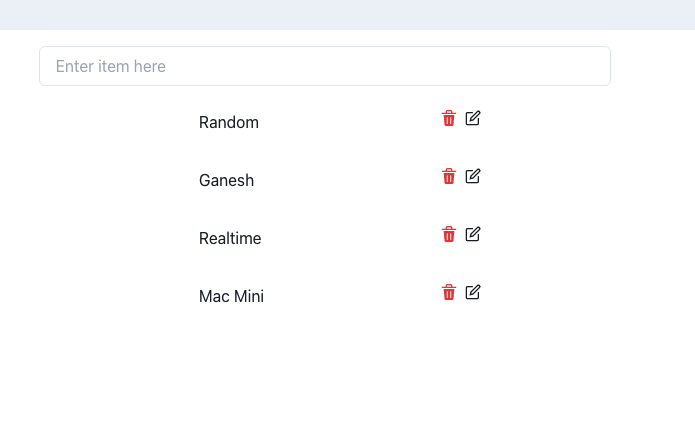
Here’s a simple UI behaviour to understand the functionality. When you add a new item and enter it, it will create a todo item. it will be added into the list automatically( we will use a react-query to achieve that). you can edit or delete a todo item from the list.
If you’re new to React Query, React Query is a manage the server state of client side application. it is often described as data-fetching library of React. it makes fetching, caching, synchronizing and updating server state in the React application.
create Todos/index.tsx to handle the list and Todos/Add.tsx for handling inserting todo item. Once you create those components, import them into index.tsx.
return (
  <Layout>
    <Container>
      <AddTodo />
      <Todos />
    </Container>

    <Toaster />
  </Layout>
);
Todo/Add.tsx
import { useState, useEffect } from "react";
import { useMutation, useQueryClient } from "react-query";
import toast, { Toaster } from "react-hot-toast";
import { User } from "@supabase/supabase-js";
import { Container, Input, ListItem, OrderedList } from "@chakra-ui/react";
import { supabaseClient } from "@lib/supabaseClient";
import useUser from "@hooks/useUser";

const AddTodo = () => {
  const [currentItem, setCurrentItem] = useState < string > "";
  const { user } = useUser();
  const queryClient = useQueryClient();

  const { mutate: addTodoMutation } = useMutation(
    async (payload: { item: string, user: User }) => {
      const { data, error } = await supabaseClient.from("todos").insert([
        {
          name: payload.item,
          user_id: payload.user.id,
        },
      ]);

      if (error) {
        console.log("Error", error);
      }
      return data;
    },
    {
      onSuccess: () => {
        toast.success("Item Added successfully");
        setCurrentItem("");
        return queryClient.invalidateQueries("todos");
      },
    }
  );

  const _handleAddItem = async (item: string) => {
    addTodoMutation({ item, user: user });
  };

  return (
    <Input
      type={"text"}
      value={currentItem}
      placeholder="Enter item here"
      onChange={(e) => setCurrentItem(e.target.value)}
      onKeyPress={(e) => {
        if (e.key === "Enter") {
          _handleAddItem(currentItem);
        }
      }}
    />
  );
};

export default AddTodo;
Here, we have an input for user to add the todo item. When user press enter, we invoke _handleAddItem function that handles the data insert.
Since we are using react-query for queries and mutations. we will use useMutation to handle function to insert data.
const { mutate: addTodoMutation } = useMutation(
  async (payload: { item: string, user: User }) => {
    const { data, error } = await supabaseClient.from("todos").insert([
      {
        name: payload.item,
        user_id: payload.user.id,
      },
    ]);

    if (error) {
      console.log("Error", error);
    }
    return data;
  },
  {
    onSuccess: () => {
      toast.success("Item Added successfully");
      setCurrentItem("");
      return queryClient.invalidateQueries("todos");
    },
  }
);
One important thing to note here is invalidateQueries . it’s an important feature of react query to invalidate the todo list whenever a new item is added.
return queryClient.invalidateQueries("todos");When it is invalid, react-query fetches the data again for the tag todos and update the list. we will discuss it when we implement the GET request using supabase.
Reading Data
To implement todo list, create Todos/index.tsx and add the following code,
import { useState } from "react";
import {
  QueryClient,
  useMutation,
  useQuery,
  useQueryClient,
} from "react-query";
import { supabaseClient } from "@lib/supabaseClient";
import {
  Spinner,
  Stack,
  ListItem,
  OrderedList,
  ListIcon,
  HStack,
  VStack,
  Flex,
  Text,
} from "@chakra-ui/react";
import { DeleteIcon, EditIcon } from "@chakra-ui/icons";
import toast from "react-hot-toast";

const Todos = () => {
  const [isOpen, setIsOpen] = useState<boolean>(false);
  const [selectedItem, setSelectedItem] = useState<{
    id: number;
    name: string;
  }>();

  const queryClient = useQueryClient();

  const { data, isLoading, isError, isSuccess } = useQuery(
    "todos",
    async () => {
      const { data, error } = await supabaseClient
        .from("todos")
        .select()
        .order("id", { ascending: true });

      if (error) {
        throw new Error(error.message);
      }

      return data;
    }
  );

  if (isLoading) {
    return (
      <Stack>
        <Spinner size="xl" />
      </Stack>
    );
  }

  return (
    <>
      <VStack>
        {data!.map((todo: any) => (
          <HStack key={todo.id} spacing="24px">
            <Flex p={6} w="300px" h="50px" justifyContent="space-between">
              <Text>{todo.name}</Text>

              <Flex w="10px">
                <DeleteIcon
                  cursor={"pointer"}
                  color="red.500"
                  mr="2"
                  onClick={() => {}}
                />
                <EditIcon
                  cursor={"pointer"}
                  onClick={() => {}}
                />
              </Flex>
            </Flex>
          </HStack>
        ))}
      </VStack>
    </>
  );
};

export default Todos;
To fetch the data from database, we implement useQuery hook from react-query with a function to fetch the data from supabase.
const { data, isLoading, isError, isSuccess } = useQuery("todos", async () => {
  const { data, error } = await supabaseClient
    .from("todos")
    .select()
    .order("id", { ascending: true });

  if (error) {
    throw new Error(error.message);
  }

  return data;
});
Important thing to note here is the supabaseClient.from. It specifies the table that we need to fetch the data from and we can use select to specify the column that we need to fetch.
Editing Data
To edit the data in the list, user clicks on the edit icon and update the item. To achieve that behaviour, we will have a modal that shows the selected item and user can update it.
Create Todos/UpdateModal.tsx and add the following code,
import { useState, useEffect } from "react";
import { useMutation, useQueryClient } from "react-query";
import {
  Modal,
  ModalOverlay,
  ModalContent,
  ModalBody,
  ModalCloseButton,
  ModalHeader,
  useDisclosure,
  Input,
} from "@chakra-ui/react";
import toast from "react-hot-toast";

//Internal dependencies
import { supabaseClient } from "@lib/supabaseClient";

type Prop = {
  todo: {
    id: number,
    name: string,
  },
  isOpen: boolean,
  onClose: () => void,
};

const UpdateTodoModal = ({ todo, isOpen, onClose }: Prop) => {
  const [currentItem, setCurrentItem] = useState(todo?.name);

  useEffect(() => {
    if (todo) {
      setCurrentItem(todo.name);
    }
  }, [todo]);

  const queryClient = useQueryClient();

  const { mutate } = useMutation(
    async (item: any) => {
      const { data, error } = await supabaseClient
        .from("todos")
        .update({ name: item.name })
        .match({ id: item.id });

      if (error) {
        toast.error("Something went wrong");
        return error;
      }

      return data;
    },
    {
      onSuccess: () => {
        toast.success("Item Updated successfully");
        setCurrentItem("");
        onClose();
        return queryClient.refetchQueries("todos");
      },
    }
  );

  const _handleUpdate = (item: string) => {
    mutate({ id: todo.id, name: item });
  };

  return (
    <Modal isOpen={isOpen} onClose={onClose}>
      <ModalOverlay />
      <ModalContent>
        <ModalHeader>Update Item</ModalHeader>
        <ModalCloseButton />
        <ModalBody pb={6} pt={6}>
          <Input
            type={"text"}
            value={currentItem}
            placeholder="Enter item here"
            onChange={(e) => setCurrentItem(e.target.value)}
            onKeyPress={(e) => {
              if (e.key === "Enter") {
                _handleUpdate(currentItem);
              }
            }}
          />
        </ModalBody>
      </ModalContent>
    </Modal>
  );
};

export default UpdateTodoModal;
This is similar to insert query in supabase except using update function with match by id.
const { data, error } = await supabaseClient
  .from("todos")
  .update({ name: item.name })
  .match({ id: item.id });
Deleting data
To delete an item from the list, add mutation query inside Todos/index.tsx with delete functionality.
const { mutate } = useMutation(
  async (id: number) => {
    const { data, error } = await supabaseClient
      .from("todos")
      .delete()
      .match({ id });

    if (error) {
      toast.error("Something went wrong");
      return error;
    }

    return data;
  },
  {
    onSuccess: () => {
      toast.success("Item Deleted successfully");
      return queryClient.refetchQueries("todos");
    },
  }
);
Then, update DeleteIcon onClick functionality with the delete function,
const onDeleteItemClick = async (id: number) => {
  await mutate(id);
};

return (
  <DeleteIcon
    cursor={"pointer"}
    color="red.500"
    mr="2"
    onClick={() => onDeleteItemClick(todo.id)}
  />
);
complete code for Todos/index.tsx will be,
import { useState } from "react";
import {
  QueryClient,
  useMutation,
  useQuery,
  useQueryClient,
} from "react-query";
import { supabaseClient } from "@lib/supabaseClient";
import {
  Spinner,
  Stack,
  ListItem,
  OrderedList,
  ListIcon,
  HStack,
  VStack,
  Flex,
  Text,
} from "@chakra-ui/react";
import { DeleteIcon, EditIcon } from "@chakra-ui/icons";
import toast from "react-hot-toast";

import UpdateTodoModal from "./UpdateModal";

const Todos = () => {
  const [isOpen, setIsOpen] = useState<boolean>(false);
  const [selectedItem, setSelectedItem] = useState<{
    id: number;
    name: string;
  }>();

  const queryClient = useQueryClient();

  const { data, isLoading, isError, isSuccess } = useQuery(
    "todos",
    async () => {
      const { data, error } = await supabaseClient
        .from("todos")
        .select()
        .order("id", { ascending: true });

      if (error) {
        throw new Error(error.message);
      }

      return data;
    }
  );

  const { mutate } = useMutation(
    async (id: number) => {
      const { data, error } = await supabaseClient
        .from("todos")
        .delete()
        .match({ id });

      if (error) {
        toast.error("Something went wrong");
        return error;
      }

      return data;
    },
    {
      onSuccess: () => {
        toast.success("Item Deleted successfully");
        return queryClient.refetchQueries("todos");
      },
    }
  );

  if (isLoading) {
    return (
      <Stack>
        <Spinner size="xl" />
      </Stack>
    );
  }

  const handleUpdateModalClose = () => {
    setIsOpen(!isOpen);
  };

  const onItemClick = (todo: { id: number; name: string }) => {
    setSelectedItem(todo);
    setIsOpen(true);
  };

  const onDeleteItemClick = async (id: number) => {
    await mutate(id);
  };

  return (
    <>
      <VStack>
        {data!.map((todo: any) => (
          <HStack key={todo.id} spacing="24px">
            <Flex p={6} w="300px" h="50px" justifyContent="space-between">
              <Text>{todo.name}</Text>

              <Flex w="10px">
                <DeleteIcon
                  cursor={"pointer"}
                  color="red.500"
                  mr="2"
                  onClick={() => onDeleteItemClick(todo.id)}
                />
                <EditIcon
                  cursor={"pointer"}
                  onClick={() => onItemClick(todo)}
                />
              </Flex>
            </Flex>
          </HStack>
        ))}
      </VStack>
      <UpdateTodoModal
        todo={selectedItem!}
        isOpen={isOpen}
        onClose={handleUpdateModalClose}
      />
    </>
  );
};

export default Todos;
Complete source code is available here