Building a Production-grade Nodejs,GraphQL and TypeScript Server with CI/CD Pipeline - Part 1
Building a Production-grade Nodejs,GraphQL and TypeScript Server with CI/CD Pipeline - Part 1
Building a Production-grade Nodejs,GraphQL and TypeScript Server with CI/CD Pipeline - Part 1
This article is the first part of building a production grade nodejs,graphql and typescript server with auto deployment pipeline.
Recent articles
- React Refs with some real world use cases
- Modern React Redux Tutorials with redux toolkit
- Building a Piano with React Hooks
there are tons of articles and tutorials are available to explain how to build a scalable backend solutions. but, what i felt missing was a solution that connects all the dots with a simple and proper use-cases.
Most of the time, we won’t directly jump into building the application by coding it. we would start with designing how the backend should be based on the application requirement. knowing how to do that is an important skill to have than just knowing the syntax of x or y framework.
What are we building?
Before coding, let’s see what we are going to build to learn the concepts. we will be building a Image management application where users can manage their image resources.
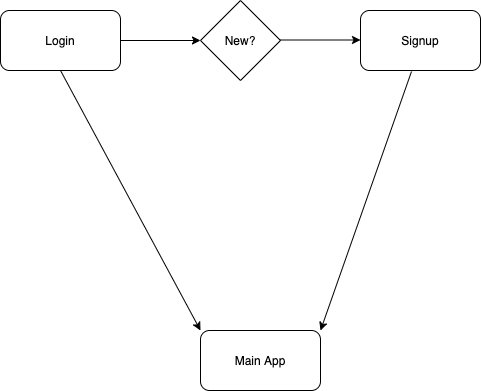
Mainly, it will contain login,signup and main application. In main application, user can upload images and view all the uploaded images. Even though it’s a simple use-case, we can understand all the concepts using this simple use-case.
Screens
Signup Screen

Login Screen

Main App Screen

Checkout the Figma file Here
Now, we know what application we are going to build. let’s apply all the best practices to build a Nodejs,GraphQL and TypeScript Server.
This part is going to explain how to setup the application and create a query and mutations using GraphQL and TypeScript.
Setup
we will be using type-graphql for your application. let’s install the required dependancies for our application,
npm i apollo-server-express express graphql reflect-metadata type-graphql mongoose- Apollo-server-express - It handles the Apollo graphql and Express connetion. apollo server connects with express for request handling.
- express- expressjs handles the requests in the server
- graphql - it is used to handle the graphql schema and resolvers.
- type-graphql - This library is used to manage all the types in graphql.
- mongoose - library used to connect with mongodb database
npm i --save-dev @types/express @types/graphql @types/node nodemon ts-node ts-node-dev typescriptAbove dependancies helps us to manage the types and development server daemon for our application.
Now, we need to configure tsconfig file in our application. create a file tsconfig.json and add the following,
{
  "compilerOptions": {
    "target": "es6",
    "module": "commonjs",
    "lib": ["dom", "es6", "es2017", "esnext.asynciterable"],
    "sourceMap": true,
    "outDir": "./dist",
    "moduleResolution": "node",
    "declaration": false,
    "composite": false,
    "removeComments": true,
    "noImplicitAny": true,
    "strictNullChecks": true,
    "strictFunctionTypes": true,
    "noImplicitThis": true,
    "noUnusedLocals": true,
    "noUnusedParameters": true,
    "noImplicitReturns": true,
    "noFallthroughCasesInSwitch": true,
    "allowSyntheticDefaultImports": false,
    "emitDecoratorMetadata": true,
    "experimentalDecorators": true,
    "skipLibCheck": true,
    "baseUrl": ".",
    "rootDir": "src"
  },
  "exclude": ["node_modules"],
  "include": ["./src/**/*.tsx", "./src/**/*.ts"]
}
create a file src/server.ts and add the following code,
import { ApolloServer } from "apollo-server-express";
import * as Express from "express";
import "reflect-metadata";
import { buildSchema } from "type-graphql";

import * as Mongoose from "mongoose";
async function startServer() {
  require("dotenv").config(__dirname + ".env");

  const schema = await buildSchema({
    resolvers: [],
    emitSchemaFile: true,
  });

  const app = Express();

  const MONGO_USER = process.env.MONGODB_USER;
  const MONGO_PASS = process.env.MONGODB_PASS;

  Mongoose.connect(
    `mongodb+srv://${MONGO_USER}:${MONGO_PASS}@cluster0-xv4mh.mongodb.net/test?retryWrites=true&w=majority`,
    {
      useNewUrlParser: true,
      useUnifiedTopology: true,
    }
  )
    .then((res) => {
      console.log("Mongodb is connected successfully");

      const server = new ApolloServer({
        schema,
        context: () => ({}),
      });

      server.applyMiddleware({ app });
      const PORT = process.env.PORT;
      app.listen(PORT, () => {
        console.log(`server is running on PORT ${PORT}`);
      });
    })
    .catch((err) => {
      console.log(err);
    });
}

startServer();
On the above code, we create a async function to bootstrap our application.
async function startServer() {
  //Main code comes Here
}

startServer();
Inside the function, we build the schema for your application by providing the resolvers. yeah, you read it right.. Graphql schemas are auto generated in type-graphql.
 const schema = await buildSchema({
    resolvers: [//our resolvers come here],
    emitSchemaFile: true,
  });
After that, we connect with MongoDB Database and start our serve.
Mongoose.connect(
  `mongodb+srv://${MONGO_USER}:${MONGO_PASS}@cluster0-xv4mh.mongodb.net/test?retryWrites=true&w=majority`,
  {
    useNewUrlParser: true,
    useUnifiedTopology: true,
  }
)
  .then((res) => {
    console.log("Mongodb is connected successfully");

    const server = new ApolloServer({
      schema,
      context: () => ({}),
    });

    server.applyMiddleware({ app });
    const PORT = process.env.PORT;
    app.listen(PORT, () => {
      console.log(`server is running on PORT ${PORT}`);
    });
  })
  .catch((err) => {
    console.log(err);
  });
Environment Variable Setup
we will be using dotenv in our application to manage the environment variables for development.
require("dotenv").config(__dirname + ".env");.env
PORT=5678
MONGODB_USER=root
MONGODB_PASS=Root!23456
Now, we got everything to run the basic server in typescript. To run the development typescript server, add the following script in application.
"dev": "ts-node-dev --respawn src/server.ts"you can run your development server using the command,
npm run devDDD for our Application
Let’s break our application into domains. so, that we can wrap our business logic based on the domains.
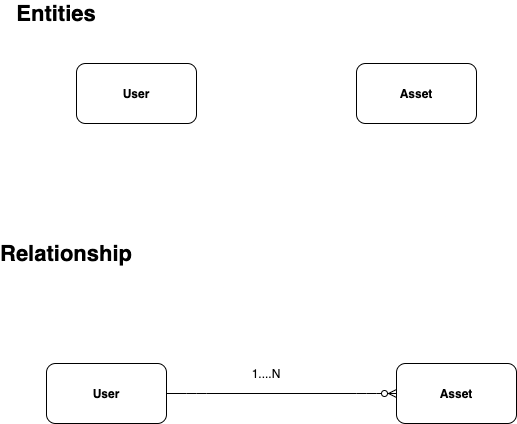
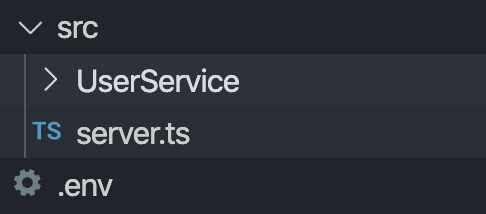
Here, we can consider the entities as our feature. we have User and Asset as an entity. Let’s create the file structure based on that,
Let’s start with User Service and create all the Queries and Mutations for that service.
MongoDB and TypeScript
To work with MongoDB and Typescript, let’s install few dependancies that are required.
npm i --save-dev @types/mongooseAfter that, create a UserModel.ts file in the UserService and add the following code.
import * as Mongoose from "mongoose";

export interface IUser extends Mongoose.Document {
  name: String;
  email: String;
  password: String;
}

const UserSchema: Mongoose.Schema = new Mongoose.Schema(
  {
    name: {
      type: String,
      required: true,
    },
    email: {
      type: String,
      required: true,
    },
    password: {
      type: String,
      required: true,
    },
  },
  { timestamps: true }
);

export default Mongoose.model<IUser>("User", UserSchema);
On the above code, we define a mongoose schema which returns type mongoose schema along with the fields for User Model.
After that, we define an interface for our User Model,
export interface IUser extends Mongoose.Document {
  name: String;
  email: String;
  password: String;
}
If you are new to typescript interfaces, checkout this docs to know more.
export default Mongoose.model<IUser>("User", UserSchema);Finally, we export the mongoose model which implements IUser interface. we have successfully create our mongoose model.
Note: Here i am using MongoDB as database. if you want to use SQL, checkout this series from ben awad
Resolvers
Every resolver in type-graphql starts with an Resolver decorator tag with it.
@Resolver((of) => UserSchema)
export class UserResolver {
  //Queries and Mutation Comes Here
}
Here, we define it is a resolver of a particular Schema. Let’s write the schema file for user and continue with resolver function.
UserSchema.ts
import { Field, ObjectType, ID } from "type-graphql";
import { IsEmail, Length } from "class-validator";

@ObjectType({ description: "User Schema" })
export default class User {
  @Field(() => ID)
  id: String;

  @Field()
  @Length(1, 30)
  name: String;

  @Field()
  @IsEmail()
  @Length(1, 30)
  email: String;

  password: String;
}
On the above code, we define it is an Object type with a decorator. For every field, we have a Field decorator. So that, it will reflects in the graphql schema. we can also validate different parameters such as length and email.
If you watch it carefully, we haven’t set any decorators for password. if you don’t want a value to be in the graphql schema. we have left it out from Field decorator. import the schema in our resolver.
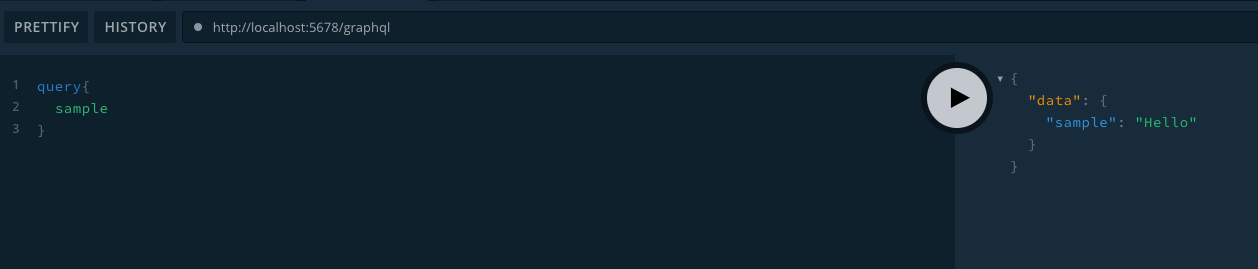
import UserSchema from "./UserSchema";Let’s write a sample Query and test it out whether our setup is working correctly.
@Query(() => String)
  sample(): String {
    return "Hello";
  }
Every Query and Mutation starts with Query or Mutation Decorator and it’s return type. Here, we have a return type of String.
UserResolver.ts
import {
  Arg,
  FieldResolver,
  Query,
  Mutation,
  Resolver,
  Ctx,
  Root,
} from "type-graphql";
import UserSchema from "./UserSchema";

@Resolver((of) => UserSchema)
export class UserResolver {
  @Query(() => String)
  sample(): String {
    return "Hello";
  }
}
After that, import the resolver in our server file and define it in our schema resolvers
import { UserResolver } from "./UserService/UserResolver";

const schema = await buildSchema({
  resolvers: [UserResolver],
  emitSchemaFile: true,
});
Now, we have a Typescript GraphQL Server running successfully in our machine.

Conclusion
I am wrapping up this part here, Let’s see how to create
- Login
- Register
- Authentication
- File Upload
functionalities in upcoming articles. Until then Happy coding